
Burke Lake Park
📍 Fairfax Station
📍 Fairfax Station
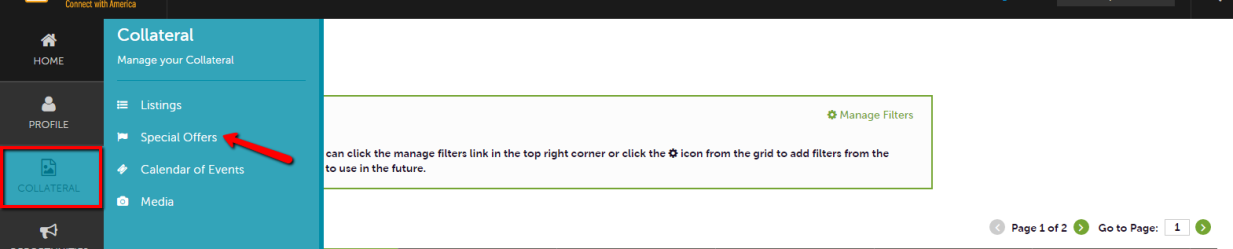
1. To add special offers to your free website listing (i.e. hotel packages, restaurant discounts or "day-of-week" promotions, attraction ticket offers, etc.), click Collateral on the left navigation, then Special Offers.
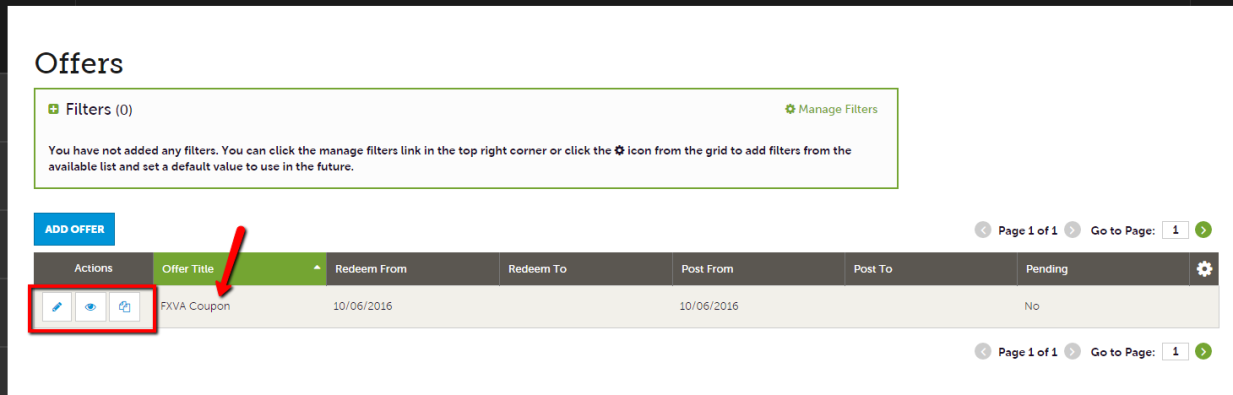
2. You will now be presented with your property’s offers (if any). The pencil icon will allow you to edit an existing offer. By clicking the eyeball icon, you can view the existing offer. The clone icon will allow you to duplicate an offer. You can also create a new offer by clicking the Add Offer button.
3. When you view, edit, or add an offer, you can quickly scroll to a section on the page by clicking the links to the left of the page. If you are viewing an offer, the button on the top left will say Edit. If you are editing an offer, the top left button will say Save. You MUST click the SAVE button before any of your changes are actually saved! As with listings, you have the ability to attach images to your offers.
IMPORTANT NOTE: Any edits or adding of offers will require approval from Visit Fairfax. Upon saving your updates, we will be notified of your changes/adds and will email when the changes are updated.
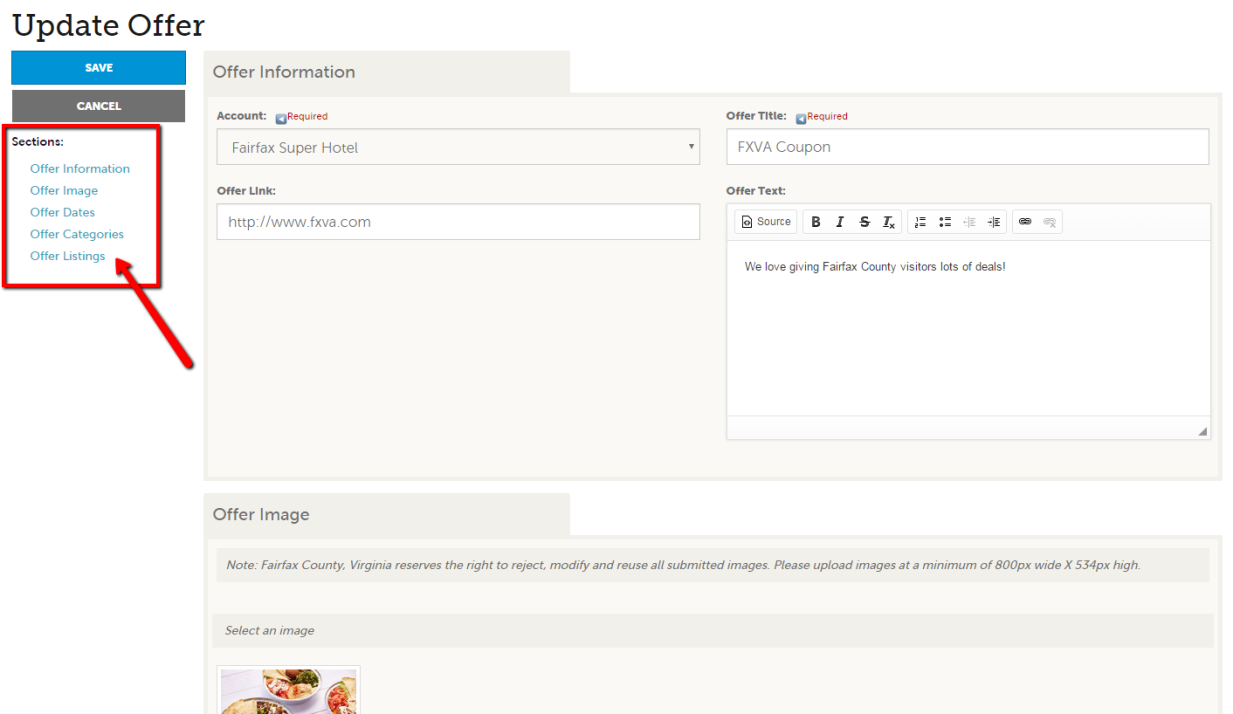
4. Offer Information: The Offer Title will display on your deal. The Offer Link will link to the offer. The Offer Text should be a brief description of the deal.
5. Offer Image: Please choose the image to accompany your special offer.
6. Offer Dates:
a. Redeem From and To = valid dates.
b. Post From and To = display dates.
IMPORTANT: If your offer does not have any "end" dates, please leave the "Redeem To" and "Post To" fields empty.
7. Offer Categories: Please select one or more categories that will determine where your offer will appear on www.fxva.com.
8. Remember to Save.
Next Step: Click here to Add Photos (Media)
Home: Take Me Back to Start
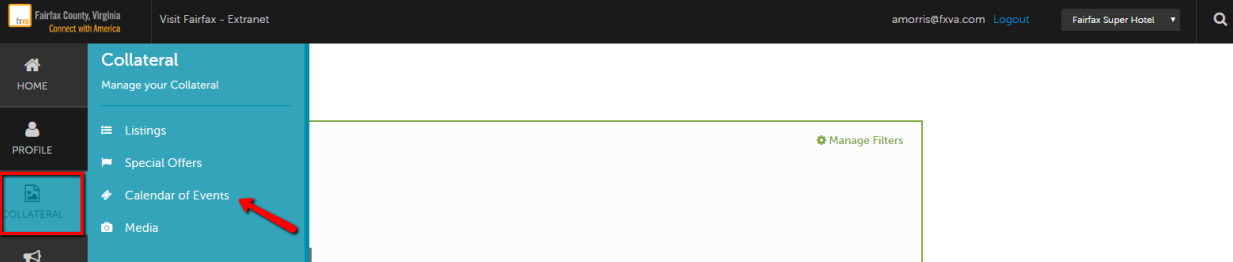
1.To add an event to Visit Fairfax's Events Calendar, click Collateral on the left navigation, then Calendar of Events.
2. When you click "Add Event," you will be presented with a form. Please fill out each field according to your event details. You can skip through each section using the links to the left of the page. Remember to click SAVE when you are finished with all fields.
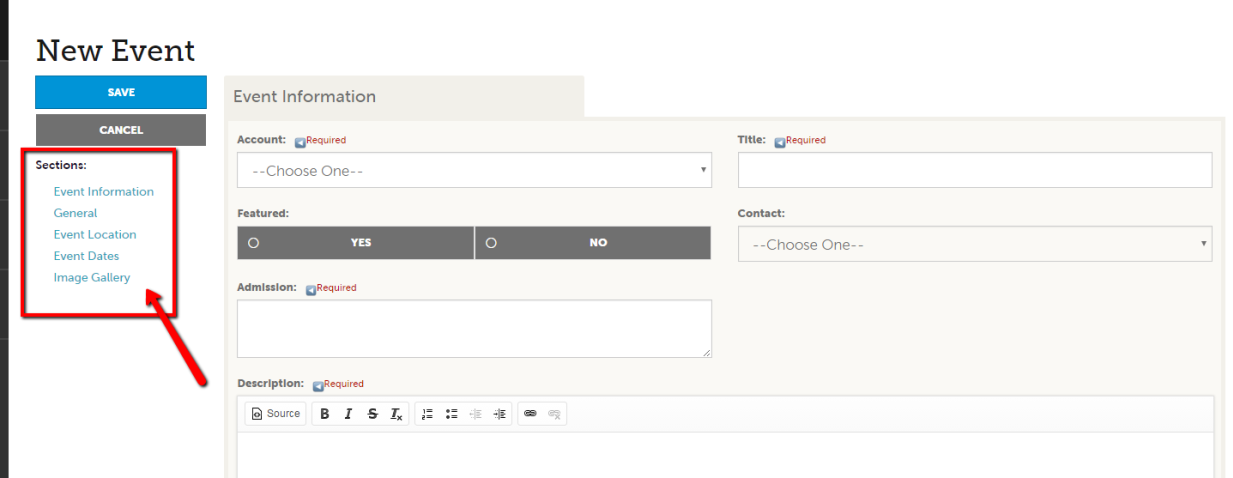
3. Account: Please choose the Account from the dropdown that you would like this event associated with.
4. Title: The title of your event.
5. Featured: This is for Visit Fairfax to determine.
6. Contact: If you would like a contact from your account associated with your event, please select one from the dropdown. Otherwise, leave blank.
7. Admission: Please enter the cost of this event. If it is free, just note that here.
8. Description: Please enter all event details here.
9. Email: If you would like to add an email address for contact purposes, please list here. Otherwise, leave blank.
10. Rank: If your event occurs every day, please select "On-going." If your event happens only once, or only once a week, please select "Events."
11. Website: Please include a URL to your event page.
12. Phone: Please enter a phone number for attendees to contact you.
13. Categories: Please choose a minimum of one category.
14. Buy Tickets: Please enter a specific URL that directs to your booking engine. If there is no link available for guests to buy tickets, please leave blank.
15. Venue Listing: If you have no venue to choose from in the dropdown (list will pull up when typing begins), enter name of event venue here.
16. Address: Please enter all valid address fields for your event.
17. Location: This will auto-populate if venue is chosen from the Venue Listing dropdown. If it does not, type in the name of the event venue.
18. Start Date: Please enter the date of your event.
19. Times: If your event is multiple times, please enter here. (i.e. Performances at 2pm, 6pm, and 10pm.)
20. Start Time: Please use the field-picker to select the specific time of your event's start.
21. End Time: Please use the field-picker to select the specific time of your event's end.
22. Recurrence: Please use this section to determine recurrence of your event. If your event is one day only, choose "One Day." If your event occurs every day for a week, choose "Daily." If your event occurs weekly, please choose the day(s) of the week it occurs under "Weekly." And so on. If your event dates do not subscribe to any pattern, you can choose "Custom" and enter the specific dates your event repeats.
23. Image Gallery: Use the Drag and Drop or Browse features to select images for your event. Please note that all images should be sized at a minimum of 500x334. Visit Fairfax reserves the right to reject, modify, and reuse all submitted images.
24. Don't forget to click "SAVE" before exiting page.
IMPORTANT: Visit Fairfax will receive notification of your submitted event and will approve on a case-by-case basis. Depending on event status, you will receive an approval/denial notification via email.
Next Step: Click here to Add Photos (Media)
Home: Take Me Back to Start


